IIRF Online > Development > Software Engineering > Microservices > Master Microservices with Spring Boot and Spring Cloud
Master Microservices with Spring Boot and Spring Cloud by Udemy
Java Spring Boot Microservices 5-in-1 - Spring Boot, Spring Cloud, Docker, Kubernetes and REST API (REST Web Services)
Course Highlights
- Develop and design REST API and REST WEB SERVICES with Spring Boot
- Develop MICROSERVICES with Spring Boot and Spring Cloud
- Orchestrate microservices with KUBERNETES
- Create containers for microservices with DOCKER
- IMPLEMENT Exception Handling, Validation, HATEOAS and filtering for RESTful Web Services.
- Implement client side load balancing (Ribbon), Dynamic scaling(Eureka Naming Server) and an API Gateway (Zuul)
- You will setup Centralized Microservices Configuration with Spring Cloud Config Server
- You will learn to implement Distributed tracing for microservices with Spring Cloud Sleuth and Zipkin
- You will implement Fault Tolerance for microservices with Hystrix
- You will understand how to version your RESTful Web Services
- You will understand how to monitor RESTful Services with Spring Boot Actuator
- You will understand how to document RESTful Web Services with Swagger
- You will understand the best practices in designing RESTful web services
- Using Spring Cloud Bus to exchange messages about Configuration updates
- Simplify communication with other Microservices using Feign REST Client
Skills you will learn!
Curriculum
5 Topics
Microservices and RESTful APIs with Spring Boot and Spring Cloud - Preview
DO NOT SKIP: Success Stories of Other Learners
Introduction to the Course & Course Guide
A surprise! New Course Updates
DO NOT SKIP: Join in28minutes Learning Community
8 Topics
What is a Web Service?
Important How Questions related to Web Services
Web Services - Key Terminology
Introduction to SOAP Web Services
Maximizing Learning Efficiency with Playback Speed
Introduction to RESTful Web Services
SOAP vs RESTful Web Services
How to remember things for long time
53 Topics
DO NOT SKIP: New to Spring Boot?
Course Downloads
Step 00 - Creating a REST API with Spring Boot - An Overview
CODE BACKUP FILES and STEP BY STEP CHANGES : For Reference
Step 01 - Initializing a REST API Project with Spring Boot
Step 02 - Creating a Hello World REST API with Spring Boot
Story of in28minutes
Step 03 - Enhancing the Hello World REST API to return a Bean
Step 04 - What's happening in the background? Spring Boot Starters & Autoconfign
Step 05 - Enhancing the Hello World REST API with a Path Variable
Step 06 - Designing the REST API for Social Media Application
Step 07 - Creating User Bean and UserDaoService
Resources for Next Step
Step 08 - Implementing GET Methods for User Resource
Step 09 - Implementing POST Method to create User Resource
Step 10 - Enhancing POST Method to return correct HTTP Status Code and Location
About Your Instructor
Step 11 - Implementing Exception Handling - 404 Resource Not Found
Resources for Next Step
Step 12 - Implementing Generic Exception Handling for all Resources
Step 13 - Implementing DELETE Method to delete a User Resource
Step 14 - Implementing Validations for REST API
Step 15 - Overview of Advanced REST API Features
Step 16 - Understanding Open API Specification and Swagger
springdoc-openapi Dependency for next lecture
Step 17 - Configuring Auto Generation of Swagger Documentation
Step 18 - Exploring Content Negotiation - Implementing Support for XML
Step 19 - Exploring Internationalization for REST API
Resources for Next Step
Step 20 - Versioning REST API - URI Versioning
Step 21 - Versioning REST API - Request Param Header and Content Negotiation
Step 22 - Implementing HATEOAS for REST API
Step 23 - Implementing Static Filtering for REST API
Step 24 - Implementing Dynamic Filtering for REST API
Step 25 - Monitoring APIs with Spring Boot Actuator
Step 26 - Exploring APIs with Spring Boot HAL Explorer
DO NOT SKIP - New to JPA and Hibernate?
Step 27 - Connecting REST API to H2 using JPA and Hibernate - An Overview
DO NOT SKIP - Additional Setting For Next Step - H2-CONSOLE
Step 28 - Creating User Entity and some test data
Step 29 - Enhancing REST API to connect to H2 using JPA and Hibernate
Step 30 - Creating Post Entity with Many to One Relationship with User Entity
Step 31 - Implementing a GET API to retrieve all Posts of a User
Step 32 - Implementing a POST API to create a Post for a User
Step 33 - Exploring JPA and Hibernate Queries for REST API
Step 34 - Connecting REST API to MySQL Database - An Overview
Step 34z - OPTIONAL - Installing Docker
Resources for Next Step
Course Update: Changes to MySQL Connector
Step 35 - OPTIONAL - Connecting REST API to MySQL Database - Implementation
Step 36 - Implementing Basic Authentication with Spring Security
Step 37 - Enhancing Spring Security Configuration for Basic Authentication
How to be consistent?
7 Topics
Section Introduction - Microservices with Spring Cloud
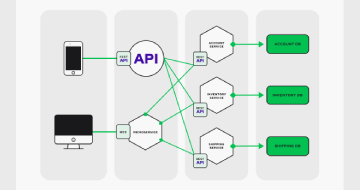
Step 00 - 01 - Introduction to Microservices
Step 00 - 02 - Challenges with Microservices
Step 00 - 03 - Introduction to Spring Cloud
Step 00 - 04 - Advantages of Microservices Architectures
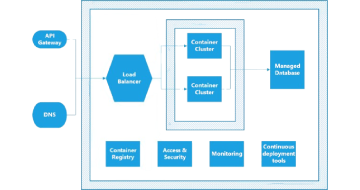
Step 00 - 05 - Microservice Components - Standardizing Ports and URL
How to Stay UpTo Date With Technology Changes
57 Topics
Next Section uses Latest Version of Spring Boot
Step 01 - Part 1 - Intro to Limits Microservice and Spring Cloud Config Server
Step 01 - Part 2 - Setting up Limits Microservice
COURSE UPDATE : Limits service with >=2.4.0 of SPRING BOOT
Step 02 - Creating a hard coded limits service
Step 03 -Enhance limits service to get configuration from application properties
Step 04 - Setting up Spring Cloud Config Server
Step 05 - Installing Git
Step 06 - Creating Local Git Repository
Step 07 - Connect Spring Cloud Config Server to Local Git Repository
Step 08 - Configuration for Multiple Environments in Git Repository
Step 09 - Connect Limits Service to Spring Cloud Config Server
Debugging problems with Spring Cloud Config Server
Step 10 - Configuring Profiles for Limits Service
Step 11 - A review of Spring Cloud Config Server
Step 12 - Introduction to Currency Conversion and Currency Exchange Microservice
IMPORTANT : SPRING BOOT AND SPRING CLOUD VERSIONS
Step 13 - Setting up Currency Exchange Microservice
Step 14 - Create a simple hard coded currency exchange service
Step 15 - Setting up Dynamic Port in the the Response
Step 16 - Configure JPA and Initialized Data
Step 17 - Create a JPA Repository
Step 18 - Setting up Currency Conversion Microservice
Step 19 - Creating a service for currency conversion
Step 20 - Invoking Currency Exchange Microservice from Currency Conversion Micro
Step 21 - Using Feign REST Client for Service Invocation
Step 22 - Setting up client side load balancing with Ribbon
COURSE UPDATE : Ribbon DOES NOT work with Spring Boot 2.4
Step 23 - Running client side load balancing with Ribbon
Debugging problems with Feign and Ribbon
Step 24 - Understand the need for a Naming Server
Step 25 - Setting up Eureka Naming Server
Step 26 - Connecting Currency Conversion Microservice to Eureka
Step 27 - Connecting Currency Exchange Microservice to Eureka
COURSE UPDATE : Exclude dependency on jackson-dataformat-xml
Step 28 - Distributing calls using Eureka and Ribbon
Debugging Problems with Naming Server ( Eureka ) and Ribbon
Step 29 - A review of implementing Eureka Ribbon and Feign
Step 30 - Introduction to API Gateways
Step 31 - Setting up Zuul API Gateway
Step 32 - Implementing Zuul Logging Filter
Step 33 - Executing a request through Zuul API Gateway
Step 34 - Setting up Zuul API Gateway between microservice invocations
Debugging Problems with Zuul API Gateway
Step 35 - Introduction to Distributed Tracing
Step 36 - Implementing Spring Cloud Sleuth
Step 37 - Introduction to Distributed Tracing with Zipkin
Step 38 - Installing Rabbit MQ
Updates to Step 39 - Running Zipkin on Windows
Step 39 - Setting up Distributed Tracing with Zipkin
Step 40 - Connecting microservices to Zipkin
Updates to Step 40 : Use spring-cloud-starter-zipkin and spring-rabbit
Step 41 - Using Zipkin UI Dashboard to trace requests
Debugging Problems with Zipkin
Step 42 - Understanding the need for Spring Cloud Bus
Step 43 - Implementing Spring Cloud Bus
Step 44 - Fault Tolerance with Hystrix
49 Topics
What's NEW in V2?
RECOMMENDED: Use Latest Spring Boot Version
Have you already completed V1?
Course Downloads
Step 01 - Setting up Limits Microservice - V2
CODE BACKUP FILES and STEP BY STEP CHANGES : For Reference
Step 02 - Creating a hard coded limits service - V2
Step 03 - Enhance limits service - Get configuration from application props - V2
Step 04 - Setting up Spring Cloud Config Server - V2
Step 05 - Installing Git and Creating Local Git Repository - V2
Debugging problems with Spring Cloud Config Server - V2
Step 06 - Connect Spring Cloud Config Server to Local Git Repository - V2
Step 07 - Connect Limits Service to Spring Cloud Config Server - V2
What should I do when I face a challenge
Step 08 - Configuring Profiles for Limits Service - V2
Debugging Guide for Microservices V2 + Docker + Docker Compose
Step 09 - Introduction to Currency Conversion & Exchange Microservices - V2
Step 10 - Setting up Currency Exchange Microservice - V2
URL and Response Structure for Currency Exchange Service
Step 11 - Create a simple hard coded currency exchange service - V2
Step 12 - Setting up Dynamic Port in the the Response - V2
Step 13 - Configure JPA and Initialized Data - V2
CODE BACKUP FILES and STEP BY STEP CHANGES : For Reference
Step 14 - Create a JPA Repository - V2
How to take care of yourselves
Step 15 - Setting up Currency Conversion Microservice - V2
URL and Response Structure for Currency Conversion Service
Step 16 - Creating a service for currency conversion - V2
Step 17 - Invoking Currency Exchange from Currency Conversion Microservice - V2
Step 18 - Using Feign REST Client for Service Invocation - V2
Step 19 - Understand Naming Server and Setting up Eureka Naming Server - V2
Debugging Problems with Eureka - V2
Step 20 - Connect Currency Conversion & Currency Exchange Microservices - V2
All Work and No Play Make Adam and Eve Dull Kids
Course Update - Github Repositories
Step 21 - QuickStart by Importing Microservices
Step 22 - Load Balancing with Eureka Feign & Spring Cloud LoadBalancer - V2
Step 22 - Setting up Spring Cloud API Gateway
URLs for next Lecture
Step 23 - Enabling Discovery Locator with Eureka for Spring Cloud Gateway
Debugging Problems with Spring Cloud Gateway - V2
Step 24 - Exploring Routes with Spring Cloud Gateway
Step 25 - Implementing Spring Cloud Gateway Logging Filter
Step 26 - Getting started with Circuit Breaker - Resilience4j
DO NOT SKIP: Update to Step 28 and Step 29 - Change in Configuration
Step 27 - Playing with Resilience4j - Retry and Fallback Methods
Step 28 - Playing with Circuit Breaker Features of Resilience4j
Step 29 - Exploring Rate Limiting and BulkHead Features of Resilience4j - V2
How to be Productive - 3 Tips
29 Topics
Step 00 - Match made in Heaven - Docker and Microservices
Step 01 - Installing Docker - Docker - V2
RECOMMENDATION : Use PowerShell in Windows!
Step 02 - Your First Docker Usecase - Deploy a Spring Boot Application
Step 03 - Docker Concepts - Registry Repository Tag Image and Containers
Step 04 - Playing with Docker Images and Containers
Step 05 - Understanding Docker Architecture - Docker Client Docker Engine
Step 06 - Why is Docker Popular
Step 07 - Playing with Docker Images
Step 08 - Playing with Docker Containers
Step 09 - Playing with Docker Commands - stats system
Why should you teach others
Step 10 - Introduction to Distributed Tracing
Step 11 - Launching Zipkin Container using Docker
Step 12 00 - Getting Started with Observability and OpenTelemetry
Next Lecture - Configuration for Connecting Microservices with Zipkin
Step 12 - Connecting Currency Exchange Microservice with Zipkin
Step 13 - Connecting Currency Conversion Microservice & API Gateway with Zipkin
Link for the Next Lecture
Step 14 - Getting Setup with Microservices for Creating Container Images
Step 15 - Creating Container Image for Currency Exchange Microservice
Step 16 - Getting Started with Docker Compose - Currency Exchange Microservice
Step 17 - Running Eureka Naming Server with Docker Compose
Step 18 - Running Currency Conversion Microservice with Docker Compose
Step 19 - Running Spring Cloud API Gateway with Docker Compose
Debugging Problems with Docker Compose
Spring Boot 3 Update - Zipkin URL Configuration
Step 20 - Running Zipkin with Docker Compose
How to handle failures
35 Topics
Step 00 - Docker Kubernetes and Microservices - Made for each other
Step 01 - Getting Started with Docker Kubernetes and Google Kubernetes Engine
Step 02 - Creating Google Cloud Account
Step 03 - Creating Kubernetes Cluster with Google Kubernete Engine (GKE)
Step 04 - Review Kubernetes Cluster and Learn Few Fun Facts about Kubernetes
Step 05 - Deploy Your First Spring Boot Application to Kubernetes Cluster
Commands executed in this section
Step 06 - Quick Look at Kubernetes Concepts - Pods Replica Sets and Deployment
Step 07 - Understanding Pods in Kubernetes
Step 08 - Understanding ReplicaSets in Kubernetes
Step 09 - Understanding Deployment in Kubernetes
Step 10 - Quick Review of Kubernetes Concepts - Pods Replica Sets & Deployments
Technology Change is an Opportunity
Step 11 - Understanding Services in Kubernetes
Step 12 - Quick Review of GKE on Google Cloud Console
Step 13 - Understanding Kubernetes Architecture - Master Node and Nodes
Installing Gcloud
Installing Kubectl
Link for the Next Lecture
Step 14 - Setup Currency Exchange & Conversion Microservices - Kubernetes
Step 15 - Container images for Exchange & Currency Conversion Microservices
Step 16 - Deploy Microservices to Kubernetes & Understand Service Discovery
Step 17 - Creating Declarative Configuration Kubernetes YAML for Microservices
Step 18 - Clean up Kubernetes YAML for Microservices
Step 19 - Enable Logging and Tracing APIs in Google Cloud Platform
Step 20 - Deploying Microservices using Kubernetes YAML Configuration
Step 21 - Playing with Kubernetes Declarative YAML Configuration
Step 22 - Creating Environment Variables to enable Microservice Communication
Step 23 - Understanding Centralized Configuration in Kubernetes - Config Maps
Step 24 - Exploring Centralized Logging and Monitoring in GKE
Step 25 - Exploring Microservices Deployments with Kubernetes
Step 26 - Configuring Liveness and Readiness Probes for Microservices with K8S
Step 27 - Autoscaling Microservices with Kubernetes
Step 28 - Delete Kubernetes Cluster and Thank You!
How can you help us?
3 Topics
DO NOT SKIP - I Would Love To Congratulate You!
Thank You
Bonus Lecture
15 Topics
Step 01 - Getting Started with Spring Boot - Goals
Step 02 - Understanding the World Before Spring Boot - 10000 Feet Overview
Step 03 - Setting up New Spring Boot Project with Spring Initializr
Step 04 - Build a Hello World API with Spring Boot
Step 05 - Understanding the Goal of Spring Boot
Step 06 - Understanding Spring Boot Magic - Spring Boot Starter Projects
Step 07 - Understanding Spring Boot Magic - Auto Configuration
Step 08 - Build Faster with Spring Boot DevTools
Step 09 - Get Production Ready with Spring Boot - 1 - Profiles
Step 10 - Get Production Ready with Spring Boot - 2 - ConfigurationProperties
Step 11 - Get Production Ready with Spring Boot - 3 - Embedded Servers
Step 12 - Get Production Ready with Spring Boot - 4 - Actuator
Step 13 - Understanding Spring Boot vs Spring vs Spring MVC
Step 14 - Getting Started with Spring Boot - Review
Share Your Experience
6 Topics
01 Step 01 - What is JUnit and Unit Testing?
01 Step 02 - Your First JUnit Project and Green Bar
01 Step 03 - Your First Code and First Unit Test
01 Step 04 - Exploring other assert methods
01 Step 05 - Exploring few important JUnit annotations
Reviewing Regularly is the Key
7 Topics
02 Step 00 - Introduction to Section - Mockito in 5 Steps
02 Step 01 - Setting up a Spring Boot Project
02 Step 02 - Understanding problems with Stubs
02 Step 03 - Writing your first Mockito test with Mocks
02 Step 04 - Simplifying Tests with Mockito Annotations - @Mock @InjectMocks
02 Step 05 - Exploring Mocks further by Mocking List interface
Understanding Importance of Deep Work
10 Topics
Maven Step 01 - Introduction to Maven
Maven Step 02 - Creating a Spring Boot Project with Maven
Maven Step 03 - Exploring Maven pom.xml for Spring Boot Project
Maven Step 04 - Exploring Maven Parent Pom for Spring Boot Project
Maven Step 05 - Exploring Maven Further
Maven Step 06 - Exploring Maven Build Lifecycle with a Spring Boot Project
Maven Step 07 - How does Maven Work?
Maven Step 08 - Playing with Maven Commands
Maven Step 09 - How are Spring Projects Versioned?
How to stay relevant
6 Topics
Gradle Step 01 - Getting Started with Gradle
Gradle Step 02 - Creating a Spring Boot Project with Gradle
Gradle Step 03 - Exploring Gradle Build and Settings Files
Gradle Step 04 - Exploring Gradle Plugins for Java and Spring Boot
Gradle Step 05 - Maven or Gradle - Which one to use for Spring Boot Projects?
Do You Know Your Learning Style
13 Topics
Step 01 - Getting Started with JPA and Hibernate - Goals
Step 02 - Setting up New Spring Boot Project for JPA and Hibernate
Step 03 - Launching up H2 Console and Creating Course Table in H2
Step 04 - Getting Started with Spring JDBC
Step 05 - Inserting Hardcoded Data using Spring JDBC
Step 06 - Inserting and Deleting Data using Spring JDBC
Step 07 - Querying Data using Spring JDBC
Step 08 - Getting Started with JPA and EntityManager
Step 09 - Exploring the Magic of JPA
Step 10 - Getting Started with Spring Data JPA
Step 11 - Exploring features of Spring Data JPA
Step 12 - Understanding difference between Hibernate and JPA
How to Decide Your Goals
10 Topics
Step 00 - Introduction to Functional Programming - Overview
Step 01 - Getting Started with Functional Programming with Java
Step 02 - Writing Your First Java Functional Program
Step 03 - Improving Java Functional Program with filter
Step 04 - Using Lambda Expression to enhance your Functional Program
Step 05 - Do Functional Programming Exercises with Streams Filters and Lambdas
Step 06 - Using map in Functional Programs - with Exercises
Step 07 - Understanding Optional class in Java
Step 08 - Quick Review of Functional Programming Basics
Why Should You Embrace a Growth Mindset
Master Microservices with Spring Boot and Spring Cloud
Related Microservices Courses


Thank You!
Your review has been submitted successfully.